Are you asking ‘Could I connect Java application/applet to database like MySQL?’ and the answer is definitely Yes.
You can use JDBC (Java Database Connectivity) to connect your Java application/applet with database. So Let’s start.
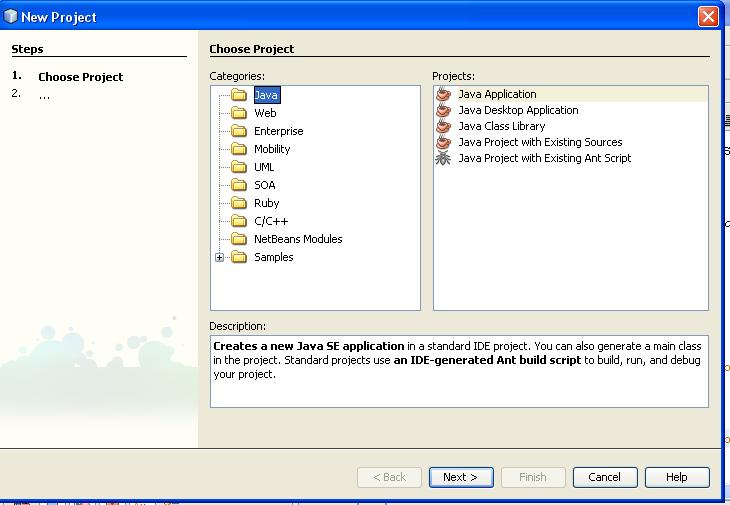
First, Create new Project named anything you want, for example Javasql by click File->New Project.

then you’ll be on this frame

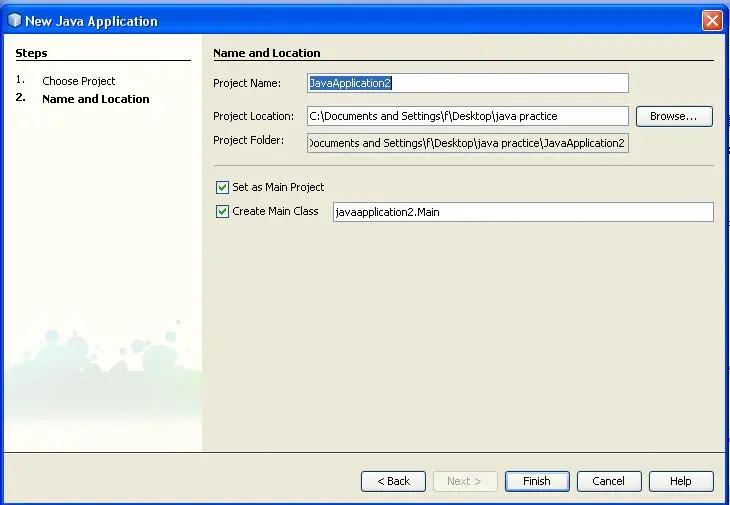
then click next, then give Project Name and set Project Localtion

then finish.
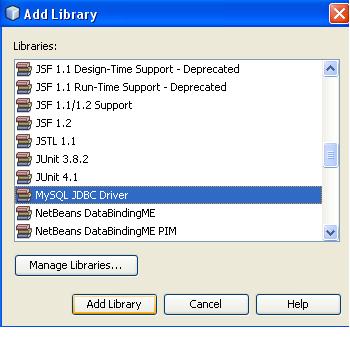
Second, you must have JDBC MySQL Driver before you can start to connect your Java program to database. But since we use Netbeans , this has been done. Just simply add the library to your project library. Right click in Library on the Project you use. 
Then choose MySQL JDBC Driver

Then Click Add Libary.
So now we can connect to MySQL database. Here is the example how you can connect to MySQL.
Here, we use interface Connection.
package javasql;
import com.mysql.jdbc.Driver;
import java.sql.*;
/**
 *
 * @author Ferdiansyah Dolot
 */
public class Connect {
    public Connect() throws SQLException{
        makeConnection();
    }

    private Connection koneksi;

     public  Connection makeConnection() throws SQLException {
        if (koneksi == null) {
             new Driver();
            // buat koneksi
             koneksi = DriverManager.getConnection(
                       "jdbc:mysql://localhost/databasename",
                       "username",
                       "password");
         }
         return koneksi;
     }

     public static void main(String args[]) {
         try {
             Connect c = new Connect();
             System.out.println("Connection established");
         }
         catch (SQLException e) {
             e.printStackTrace();
             System.err.println("Connection Failure");
         }

    }
}
In example above we create connection to MySQL from creating object of Driver and get connection from DriverManager (get Connection will return Connection Object type), with parameter the url, username, and password. The url above means the database is located in localhost and the name is databasename.You can also add port for MySQL so the url looks : “jdbc:mysql://localhost:3306/databasename”. (See port 3306).
So now we can make a connection to MySQL database. Now, how can we do SQL statement like update, delete, insert, etc?
We will discuss this in Java MySQL JDBC Tutorial using NetBeans (Part 2).
mantap lot! 😀
nanti gw submit ke regional yah linknya..
kalo bisa pake bahasa indo next time, biar bantu orang2 indo 🙂
^_^ thx
ok bos, jangan lupa oleh2 ya 🙂
wah..baru ktemu blog nie..thank buat yg nie blog punya…infonya bgus…thank b4
Wah, bung ferdi, keren dah blognya, 😀
sana ada pertanyaan nih,
berhubung saya pernahnya pake C# buat aplikasi, saya cuma dengar dari orang lain klo java tuh koneksi ke databasenya repot, coba bung ferdi kasi pembahasannya sedikit,
thx ya 😀 ,
oo paling kalo koneksi ke database dari java memerlukan jdbc driver . . .kalo di netbeans tinggal di add aja itu 😀
dicoba dulu aja bung baru bilang repot . . XD
~bung sely kan jagooo . . XD
~cewenya banyak lagi . .XD
blyank op op trigna fardifa! thank b4 🙂
Hey its really Helpful to me
Thanks alot
welcome 🙂
Thanks for this tutorial, a lot of tutorials on the web are really lengthly and confusing. I was looking for how to connect MySQL to Java and without this tutorial, I might still be searching. Keep up the good work. 😀
you’re welcome . . .
thanks for reading . .:)
this is perfect.. for those who are having problems such as:
java.sql.sqlexception no suitable driver not found
||
java.lang.classnotfoundexception com.mysql.jdbc.Driver.
this might work on your application too.
Thanks for this post.
You are awesome..
Thanks.
Glad I could help. 🙂
Hi everyone !!!
Plz i don’t know if my post is in accordance with your policy…for any problem please i present all my desolations.
I’m a bsc student in CIT . I have a project i which i want to use java applet and jdbc in a sort of host/client :
My applet is working properly in the host but when i deploy it on apache webserver i lose the jdbc connection.
Questions:
1-Is it possible to use applet with jdbc ?
2-If yes how to do it ?
3-Is there any web server in which to deploy applet and that support jdbc connection ?
my system : fedora 8 , netbeans 6.5 , xampp, mysql .
hope this could help :
JavaApplet Tutorial
Thanks. 🙂
Hi!
thanks for this tutorial ,i found it so helpful…
Is it possible to deploy an applet on a web server ?
i try it with xampp but it’s working given that i can access the applet from a client side through the LAN.
But the problem is that i receive the Gui but the JDBC connection is lost ie i can retrieve data from the web server database …
Once thanks for your help…
hmm maybe the reference has gone ? have you use the right instance ?
or maybe you can try find that problem in this book
http://rcm.amazon.com/e/cm?lt1=_blank&bc1=000000&IS2=1&bg1=FFFFFF&fc1=000000&lc1=0000FF&t=ferdidolot-20&o=1&p=8&l=as1&m=amazon&f=ifr&md=10FE9736YVPPT7A0FBG2&asins=1555583296
hope that could help.
Thanks 😀
Thank you for such a nice article. I am working on an applet for university project. And this article helped me connect it to database. I’m going to read part2 now for data modification into database.
Keep up the nice work 🙂
– Abbas From Pakistan
Thanks a lot for the tutorial, it was really helpful. 🙂
you’re welcome 😀
mantap gan…
untuk select ma sum gimana tuccchhh bagi ceritanya dunk …
thank om .. saya coba dulu .. buat tugas kampus .. hahahah 😀
gracias amigo..
you explain excellent. it’s perfect.. I hope you’ll continue the tutorial
user555
kenapa di mysql aku masih empty..ga berhasil ngisi….??? TT__TT
[…] Java MySQL JDBC Tutorial Using Netbeans Part 1 […]
Hi,
i’m doing a project which using the neabeans and mysql to create a java program. i’m new with both software that why i have search some of the tutorial available online to get better understanding, That how i come to your website, the tutorial that provide by u is very easy to understanding but the problem when i execute the code it come out a branch of error which is:
run:
Exception in thread “main” java.lang.NoClassDefFoundError: javasql/Main
Caused by: java.lang.ClassNotFoundException: javasql.Main
at java.net.URLClassLoader$1.run(URLClassLoader.java:200)
at java.security.AccessController.doPrivileged(Native Method)
at java.net.URLClassLoader.findClass(URLClassLoader.java:188)
at java.lang.ClassLoader.loadClass(ClassLoader.java:315)
at sun.misc.Launcher$AppClassLoader.loadClass(Launcher.java:330)
at java.lang.ClassLoader.loadClass(ClassLoader.java:250)
at java.lang.ClassLoader.loadClassInternal(ClassLoader.java:398)
Java Result: 1
BUILD SUCCESSFUL (total time: 0 seconds)
I have no idea what it go wrong, your fee back may important to me. thank
Thanks a lot 🙂
Thank you for your helpful tutorial. I’m using NetBeans 7.1.1 so there are a few changes since you captured your pictures. When I added the library for MySQL’s JDBC driver, the Add Library dialog box had two buttons: Create… and Import… I used Import and that worked for me.
thanks gan…bisa dibaca2 juga di ebook “manage and using musql chapter 14”
Reblogged this on Srikanth's Blog.
Thanks was a great help
Felipe
Brasil
habia implementado mucho codigo de conexion pero solo este funciono… grax
Thank you so much for the awesome tutorial. Took me almost 2 hours to reach this tutorial and it worked like magic!
Thank you so much!
Hey its really Helpful to me
Thanks alot
package javasql;
i am getting red line under it..
means error
thank you so much for the grate tutorial